What Is Home Sealing & Why Is It Important?
Insulation Sealing
What Is Home Sealing & Why Is It Important?
Reducing the amount of air that leaks in and out of your house is an easy way to cut your heating and cooling costs, increase your at-home comfort, and create a healthier indoor environment. This guide will help you understand how air circulates between the outside and inside of your home, and how home sealing can help. In this guide we’ll cover (feel free to skip to the topic you need):
What is an air seal in homes?
Common air leakage points in homes
Detecting air leaks in your home
Why seal your home & energy cost savings
What is an Air Seal in Homes?
Air from the outside comes into your house and replaces the inside air regularly and is closely linked to indoor air quality. This cycling of air inside your home helps control humidity, odors, pollutants, and the temperature of your house and is called the air exchange rate. ASHRAE, a professional association of engineers that aims to improve HVAC performance, recommends home air exchange rates of .35 per hour, but not less than 15 cubic feet of air per minute (cfm) per person to minimize any adverse air quality-related health effects.
Most homes today have air exchange rates in excess of 1-2 changes per hour, which leads to costly, inefficient heat loss in colder weather or forcing your cooling systems to work harder to cool your house during hotter temperatures. High air exchange rates are an indicator that you may have excessive air leaks in your home. Identifying and sealing air leaks is the process of creating an air seal and air sealing your house.
Common Air Leakage Points in Homes
From the roof to the foundation of your home and everything in between is a source for outside air to leak into your home. We’ll take a look at the most common source of air leaks and will explore the typical ways air leaks are sealed.
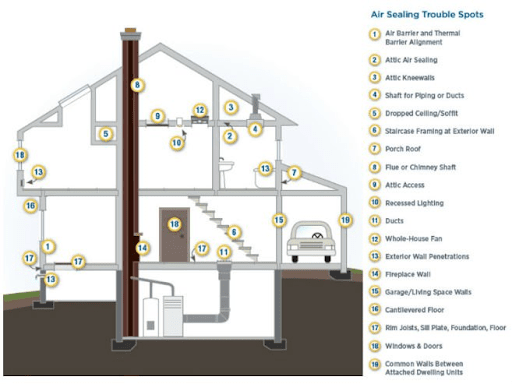
Source: https://www.energy.gov/energysaver/air-sealing-your-home
- Chimneys – a very common problem in older homes where we’ve seen large, sometimes visible gaps, between the brick and wood framing. Chimneys are a great example of where the stack effect can take place. The stack effect occurs in multistory homes when the outdoor temperature is much colder than the inside temperature. Hot air rises, so the warmer air moves upward to exit through any leaks the warm air can find. This flow of air creates negative pressure on the lower floors of your home, pulling in the cold air from the outside.
- Light Fixtures – as air is looking to find a way out of the house any ceiling or wall penetration is likely a path for air to escape and recessed lighting or other lighting fixtures are likely culprits for air leakage. Sealing these air leaks can be a challenge because the fixtures are often buried under insulation.
- Plumbing – pipes are routed throughout the house and in multi-story homes the plumbing will typically run from the basement up through the floors creating another opportunity for the stack effect to occur. As the pipes from the plumbing interface with the fixtures there is an opportunity to identify and seal air leaks to lessen the stack effect.
- Interior Walls – depending on when your home was built, many interior walls weren’t properly insulated or sealed. Even without a blower door test, it’s relatively easy to check for interior wall leaks starting with any wall penetration like an outlet or thermostat. One technique is to light an incense and hold it near the outlet to see if the smoke is drawn to the wall penetration.
- Windows & Doors – no real surprises here that windows and doors are often sources for air leakage. The amount of air leakage happening through your doors and windows is highly dependent on three factors, age, quality and installation. While doors and windows are a common source of air leaks they often are some of the easier air leaks to resolve with weatherstripping and caulk.
- Foundations – here we are looking for cracks in masonry such as stone, bricks or concrete blocks, poured foundations as well as the junction between the foundation and the wooden sill. Anywhere systems or materials are joined together, there is typically an opportunity for air leaks.
- Floors – as we discussed earlier interior walls weren’t always properly insulated and because floor systems interface with interior walls and exterior walls and were often uninsulated or poorly insulated in the first place, floors are another source of air leakage (particularly second story floors or higher).
- Wall Penetrations – pretty much any hole cut into the building envelope is often responsible for a fair amount of air leaks. Whether it’s an electrical outlet, exhaust fans, light fixtures or any other interior or exterior wall penetration you should investigate for air leaks.
- Attic Hatch Doors – an often overlooked and easily remedied source of air leakage is the door to your attic. Weatherstripping is usually an effective way to get a tight air seal on that draft above your head.
Detecting Air Leaks in Your Home
To properly air seal your home, you’ll need to find and seal as many of the leaks as you can. You might know about the obvious drafty window or door, but you’ll also need to find the less obvious leaks. For an accurate assessment of your home’s air leaks, you should hire a qualified home energy auditor. Professional home energy auditors will often conduct a blower door test to depressurize your home and detect those hard-to-find air leaks. This test will tell you where air leaks are and other areas where you need insulation.
Without a blower door test, there are some signs of air leaks that you can find yourself. A visual inspection of the inside and outside of your home is a great place to start. Check out all exterior corners, wall penetrations, where the siding and chimneys meet, and really anywhere that two different building systems interface e.g. foundation and walls. Inside your home visually inspect the following areas for any cracks or gaps that could cause air leaks including, electrical outlets, switch plates, door and window frames, electrical and gas service entrances, baseboards, weather stripping around doors, fireplace dampers, attic hatches, wall-mounted or window-mounted air conditioners, cable TV and phone lines, dryer vent, vents or fan wall penetrations.
Home Pressurization Test
You can use a simple home pressurization test to turn up the volume on leaks. This is not as successful as a blower door test, but it can help you locate leaks easier.
- When the weather is windy and cold, turn off all combustion appliances such as gas-burning furnaces and water heaters.
- Close all windows, exterior doors, and fireplace flues.
- Turn on all appliances that exhaust air outside e.g. clothes dryers, bathroom fans, stove vents, etc. Alternatively, use a large window fan to remove the air out of the rooms.
- Light an incense stick and carefully pass it around the edges of the common leak sites mentioned above. You’ll know if there are any drafts when smoke wavers or is sucked out of the room.
Why Seal Your Home & Energy Savings
When looking at why you should properly seal and insulate your home there are really two primary reasons. The first reason is to save money. Air leakage can account for 25-40 percent of the energy used for heating and cooling a typical home; home sealing and insulating can have one of the fastest paybacks of any home energy improvement project. The second primary reason to seal and insulate is to improve the indoor air quality of your home, which leads to a healthier, more comfortable home. A tight home has a healthy exchange of air to remove pollutants and reduce humidity, which can lead to mold growth.
Contractors
Finding the right contractor can be the key to having home sealing installed correctly and safely, and is certainly easier than doing it yourself. Beyond word-of-mouth recommendations, local building inspectors or trade groups may have a list of licensed contractors in your area.